This AI data scientist can take any dataset - including a messy, unsanitized one - and design and train a supervised machine learning model from it. In this example, we'll take Kaggle's Titanic: Machine Learning from Disaster challenge, and ask the AI data scientist to train a decision tree which predicts based on various characteristics of the passengers which passengers will survive the sinking of the Titanic.
We'll do this by using o1, OpenAI's powerful new reasoning model in conjunction with GPT-4o and E2B's Code Interpreter SDK. We'll use the following components:
o1-mini to generate a detailed plan with multiple code blocks.
GPT-4o-mini to extract and consolidate one final code block from the plan.
E2B Code Interpreter SDK: To run the code in a secure cloud sandbox.
In summary, we use o1 to generate the code, and E2B's SDK to run the code and return the results. The code processes the data in the uploaded CSV files, cleans the data, and architects and trains a machine learning model, displaying a chart of the model's performance.
Full code for this guide
Find the full code in our cookbook on GitHub.
Key links
Outline
Prerequisites
Install the SDKs
Set up API keys and model instructions
Add code interpreting capabilities and initialize the models
Upload the dataset
Put everything together
Run the notebook and see the results
Resources
1. Prerequisites
Ensure you have Python 3.8+ installed on your system. You will also need Jupyter Notebook or JupyterLab to run the notebook. Obtain your API keys from OpenAI and E2B: You can get your OpenAI API key here and your E2B API key here.
Download the Titanic dataset (both train.csv and test.csv ) from Kaggle and place the files in the same directory as your notebook. Create a .env file in your project directory and add your API keys as follows:
OPENAI_API_KEY=your_openai_api_key
E2B_API_KEY=your_e2b_api_key
2. Install the SDKs
Install the required packages using pip :
%pip install openai=1.45.1 e2b_code_interpreter=0.0.10 python-dotenv==1.0.1
3. Set up the API keys and model instructions
Import necessary libraries and load your API keys from the .env file:
import os
from dotenv import load_dotenv
load_dotenv()
OPENAI_API_KEY = os.getenv("OPENAI_API_KEY")
E2B_API_KEY = os.getenv("E2B_API_KEY")
Two prompts are defined, one for o1 and one for GPT-4o. The o1 prompt assigns a data scientist role and explains the schema of the uploaded CSV. If you choose different data you need to update the prompt accordingly.
O1_PROMPT = """You're a data scientist analyzing survival data from the Titanic Disaster. You are given tasks to complete and you run Python code to solve them.

Information about the Titanic dataset:
- It's in the `/home/user/train.csv` and `/home/user/test.csv` files
- The CSV files use `,` as the delimiter
- They have the following columns:
  - PassengerId: Unique passenger ID
  - Pclass: 1st, 2nd, 3rd (Ticket class)
  - Name: Passenger name
  - Sex: Gender
  - Age: Age in years
  - SibSp: Number of siblings/spouses aboard
  - Parch: Number of parents/children aboard
  - Ticket: Ticket number
  - Fare: Passenger fare
  - Cabin: Cabin number
  - Embarked: Port of Embarkation (C = Cherbourg, Q = Queenstown, S = Southampton)

Generally, you follow these rules:
- **Always format your response in Markdown**
- **Always respond only with code in code blocks like this:**
```python
{code}
```
- The Python code runs in a Jupyter notebook.
- Every time you generate Python code, it is executed in a separate cell.
- Display visualizations using `matplotlib` or any other visualization library directly in the notebook.
- You have access to the internet and can make API requests.
- You also have access to the filesystem and can read/write files.
- Install all packages before using them by running `!pip install {package}`.
- You can run any Python code you want; everything is running in a secure sandbox environment.
  """
The GPT-4o prompt is assigned the role of a software engineer, generating a complete, single block of code from the output of o1.
GPT_4O_PROMPT = """You are an expert software engineer that receives an execution plan, and then creates a single Python script that does everything in the plan. It will be executed in a single Python notebook cell."""
4. Add code interpreting capabilities and initialize the models
We first define a helper function to extract the code outputted from GPT-4o, the final model used. This function extracts all code between ``` markers, which are called code fences and used by GPT to deliminate the code.
import re
def match_code_blocks(llm_response):
pattern = re.compile(r'```python\n(.*?)\n```', re.DOTALL)
matches = pattern.findall(llm_response)
if matches:
code = "\n".join(matches)
print("> LLM-generated code:")
print(code)
return code
return ""
Now, we set up the chain which uses both of the above prompts to first generate the code, then consolidate it. We also initialize the OpenAI client. The chat function takes care of the interaction with the LLM. It calls the E2B code interpreter anytime there is a code to be run.
from openai import OpenAI
def chat(e2b_code_interpreter, user_message):
print(f"\n{'='*50}\nUser message: {user_message}\n{'='*50}")
client = OpenAI(api_key=OPENAI_API_KEY)
response_o1 = client.chat.completions.create(
model="o1-mini",
messages=[
{"role": "user", "content": O1_PROMPT},
{"role": "user", "content": user_message}
]
)
content_o1 = response_o1.choices[0].message.content
response_4o = client.chat.completions.create(
model="gpt-4o-mini",
messages=[
{"role": "system", "content": GPT_4O_PROMPT},
{"role": "user", "content": f"This is the plan I received, please write fully functional code that I can run in one notebook cell, and list all its dependencies: {content_o1}"}
]
)
content_4o = response_4o.choices[0].message.content
python_code = match_code_blocks(content_4o)
if python_code != "":
code_interpreter_results = code_interpret(e2b_code_interpreter, python_code)
return code_interpreter_results
else:
print(f"Failed to match any Python code in model's response: {content_4o}")
return []
Now we define the function that will use the code interpreter by E2B. Everytime the LLM assistant decides that it needs to execute code, this function will be used. Read more about the Code Interpreter SDK here.
def code_interpret(e2b_code_interpreter, code):
    print("Running code interpreter...")
    exec = e2b_code_interpreter.notebook.exec_cell(
        code,
        on_stderr=lambda stderr: print("[Code Interpreter]", stderr),
        on_stdout=lambda stdout: print("[Code Interpreter]", stdout),
    )

    if exec.error:
        print("[Code Interpreter ERROR]", exec.error)
    else:
        return exec.results
Upload the dataset
The CSV data files are uploaded to the code interpreter before running any code. The file paths must match the CSV files in the directory. In this case, because we are tasking the AI with a supervised learning task, we have both a testing and training data set. Read more about the file upload here.
def upload_dataset(code_interpreter):
    print("Uploading testing and training datasets to Code Interpreter sandbox...")
    with open("./test.csv", "rb") as f:
        remote_path = code_interpreter.upload_file(f)
        print("Uploaded test.csv at", remote_path)
    with open("./train.csv", "rb") as f:
        remote_path = code_interpreter.upload_file(f)
        print("Uploaded train.csv at", remote_path)
Put everything together
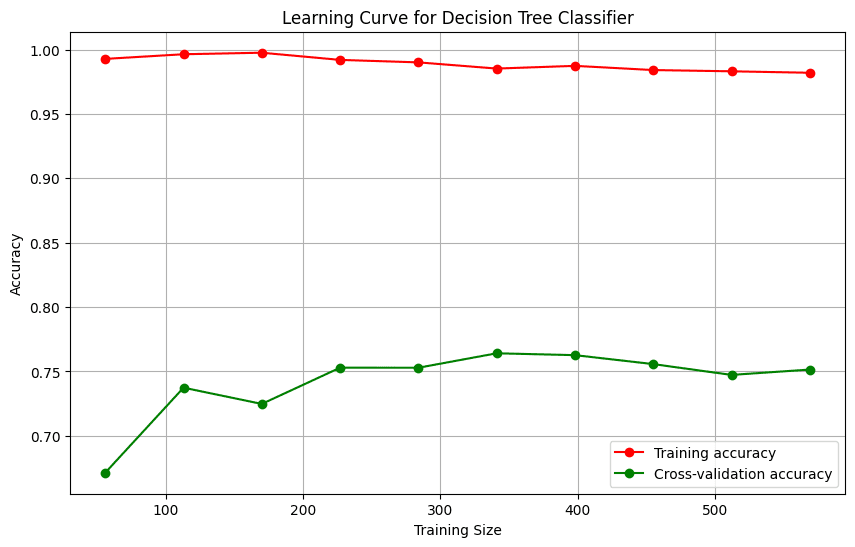
Finally we put everything together and let the AI data scientist upload the data, run an analysis, and generate a PNG file with a chart. You can update the task for the assistant in this step. For example, you can ask it to visualize the decision tree or a confusion matrix instead of the learning curve. If you decide to change the dataset you are using, don't forget to update the prompt too.
from e2b_code_interpreter import CodeInterpreter
with CodeInterpreter(api_key=E2B_API_KEY) as code_interpreter:
upload_dataset(code_interpreter)
code_results = chat(
code_interpreter,
"Clean the data, train a decision tree to predict the survival of passengers, and visualize the learning curve. Then run the model on the test dataset and print the results."
)
if code_results:
first_result = code_results[0]
else:
raise Exception("No code interpreter results")
Run the program and see the results
When you run the notebook, the following steps will occur:
Dataset upload: The Titanic datasets ( train.csv and test.csv ) are uploaded to the sandbox environment.
Code generation: The o1-mini model generates a detailed plan with code blocks to perform data cleaning, model training, and visualization.
Code extraction: The gpt-4o-mini model extracts the final executable Python code from the plan.
Code execution: The extracted code is executed in the E2B Code Interpreter sandbox.
Results: The model trains a decision tree classifier, visualizes the learning curve, and prints predictions on the test dataset.
Example Output:
Uploading testing and training datasets to Code Interpreter sandbox...
Uploaded at /home/user/train.csv
==================================================
User message: Clean the data, train a decision tree to predict the survival of passengers, and visualize the learning curve.
==================================================
> LLM-generated code:
!pip install pandas numpy matplotlib seaborn scikit-learn
import pandas as pd
import numpy as np
import matplotlib.pyplot as plt
import seaborn as sns
from sklearn.tree import DecisionTreeClassifier
from sklearn.model_selection import train_test_split, learning_curve
from sklearn.preprocessing import LabelEncoder
from sklearn.metrics import accuracy_score
train = pd.read_csv('/home/user/train.csv')
test = pd.read_csv('/home/user/test.csv')
print(train.head())
combined = pd.concat([train, test], sort=False)
Full code for this guide
Find the full code in our cookbook on GitHub.
Resources
